


A USB hub helps you connect more devices, but it can also become the biggest source of cable clutter on your desk. Without a plan, tangled wires can make your workspace look messy and make everyday tasks more frustrating.
This guide shows you how to organize USB hub cables with smart placement, better cable routing, and simple organization tips. You’ll learn how to build a cleaner workspace that stays neat as you add more devices.
What Is USB Hub Cable Management?
USB hub cable management is the process of organizing the cables connected to a USB hub so your workspace stays clean, functional, and easy to maintain.
Instead of letting cables spread across your desk, each one follows a planned route that reduces clutter while keeping your devices easy to access.
The goal isn’t to make every cable invisible. It’s to create a setup where cables are neatly organized, easy to identify, and simple to manage whenever you add or remove a device.
USB hub organization is just one part of effective desk cable management, where every cable follows a planned route to create a cleaner and easier-to-maintain workspace.
Good USB hub cable management helps you:
- Reduce cable clutter on your desk
- Keep frequently used USB ports within easy reach
- Hide permanent cables where possible
- Simplify future upgrades
- Create a workspace that’s easier to clean and maintain
A well-organized USB hub becomes the central connection point for your devices instead of the main source of cable clutter.
What Does a USB Hub Do?
A USB hub expands the number of USB ports available on your computer, allowing multiple devices to connect through a single USB-A or USB-C port.
Rather than plugging every accessory directly into your desktop or laptop, the hub acts as a central connection point for your peripherals.
Common devices connected to a USB hub include:
- Keyboard
- Mouse
- Webcam
- USB microphone
- External SSD or hard drive
- USB flash drive
- Card reader
- Printer
- Gaming controller
- Smartphone charging cable
As more devices are added, the number of cables grows. Without proper organization, the USB hub can quickly become the most cluttered area on your desk.
Why USB Hub Cables Become Messy
USB hub cable clutter rarely appears overnight. It usually builds up gradually as new devices are added without updating the original cable layout.
A keyboard, mouse, and webcam may be easy to manage, but adding an external SSD, phone charger, microphone, and other accessories can quickly turn your workspace into a tangled mess.
Understanding the most common causes makes it easier to prevent cable clutter before it starts.
Too Many Devices Connected
Every USB device adds another cable to your desk. If each cable follows a different path, they soon cross over one another and create unnecessary clutter.
Instead of organizing cables one at a time, think about how each new device fits into your existing cable layout. Planning ahead helps your workspace stay organized as your setup grows.
Using Cables That Are Too Long
Long cables are one of the biggest causes of messy desks. Excess cable often ends up coiled behind the monitor, hanging underneath the desk, or tangled with other wires.
Whenever possible, choose cables that closely match the distance they need to travel. If replacing them isn’t practical, bundle the extra length neatly with a reusable hook-and-loop strap instead of letting it hang loose.
Poor USB Hub Placement
Where you place your USB hub affects every cable connected to it. A poorly positioned hub often creates longer cable runs, visible wire crossings, and ports that are difficult to reach.
Instead of choosing a location simply because it’s out of sight, place the hub where it creates the shortest and cleanest cable paths. A good location makes cable management much easier from the start.
Mixing Permanent and Temporary Devices
Not every USB device is used the same way. Some stay connected all the time, while others are plugged in only when needed.
Permanent devices often include:
- Keyboard
- Mouse
- Webcam
- Printer
- USB microphone
Temporary devices usually include:
- USB flash drive
- External SSD
- Camera cable
- Phone charging cable
Keeping these two groups separate creates a cleaner setup. Permanent cables can stay hidden, while frequently used devices remain easy to access without reaching behind your monitor.
Plan Your Workspace Before Connecting Devices
Good USB hub cable management starts before you plug in a single cable. Spending a few minutes planning your workspace can save you from rearranging cables later and help you build a setup that’s easier to maintain.
Choose the Best Location First
Before connecting your devices, decide where your USB hub will sit. Think about which devices stay connected all the time, which USB ports you use most often, and whether your desk or monitor moves.
Choosing the right location from the start keeps cable runs shorter and frequently used ports within easy reach.
Plan One Main Cable Route
Before plugging everything in, decide how your cables will travel across your desk. Planning a single cable route now helps prevent tangled wires and makes installation much easier.
A simple layout looks like this:
Computer → USB Hub → Connected Device
Following one consistent route keeps your workspace organized and makes future upgrades much easier.
Check Cable Length Before Connecting Everything
Before connecting your devices, compare each cable’s length with the distance it needs to cover. Cables that are much longer than necessary create extra loops that quickly become tangled with other wires.
Whenever possible, use shorter cables that fit your setup. If replacing them isn’t practical, secure the excess length with reusable hook-and-loop straps instead of letting it hang loose.
Plan for Future Devices
Your workspace will probably change over time. You may add another monitor, a docking station, an external SSD, or a new webcam.
If you plan to use two or more displays, a good multi-monitor cable management system makes it much easier to keep display, power, and USB cables organized as your setup grows.
Leave one or two USB ports available if possible, and avoid filling cable trays or organizers completely. A little extra space now makes future upgrades much easier without rebuilding your entire cable management system.
Choose the Best Location for Your USB Hub

The location of your USB hub has a bigger impact on cable management than almost any accessory you can buy. A well-placed hub creates shorter cable runs, reduces visible clutter, and keeps the ports you use most within easy reach.
Place the Hub Where It’s Easy to Reach
Position your USB hub close to the devices you use most often while keeping the ports easy to access.
This creates shorter cable runs, reduces visible clutter, and makes it easier to connect USB flash drives, external SSDs, and charging cables without reaching behind your monitor.
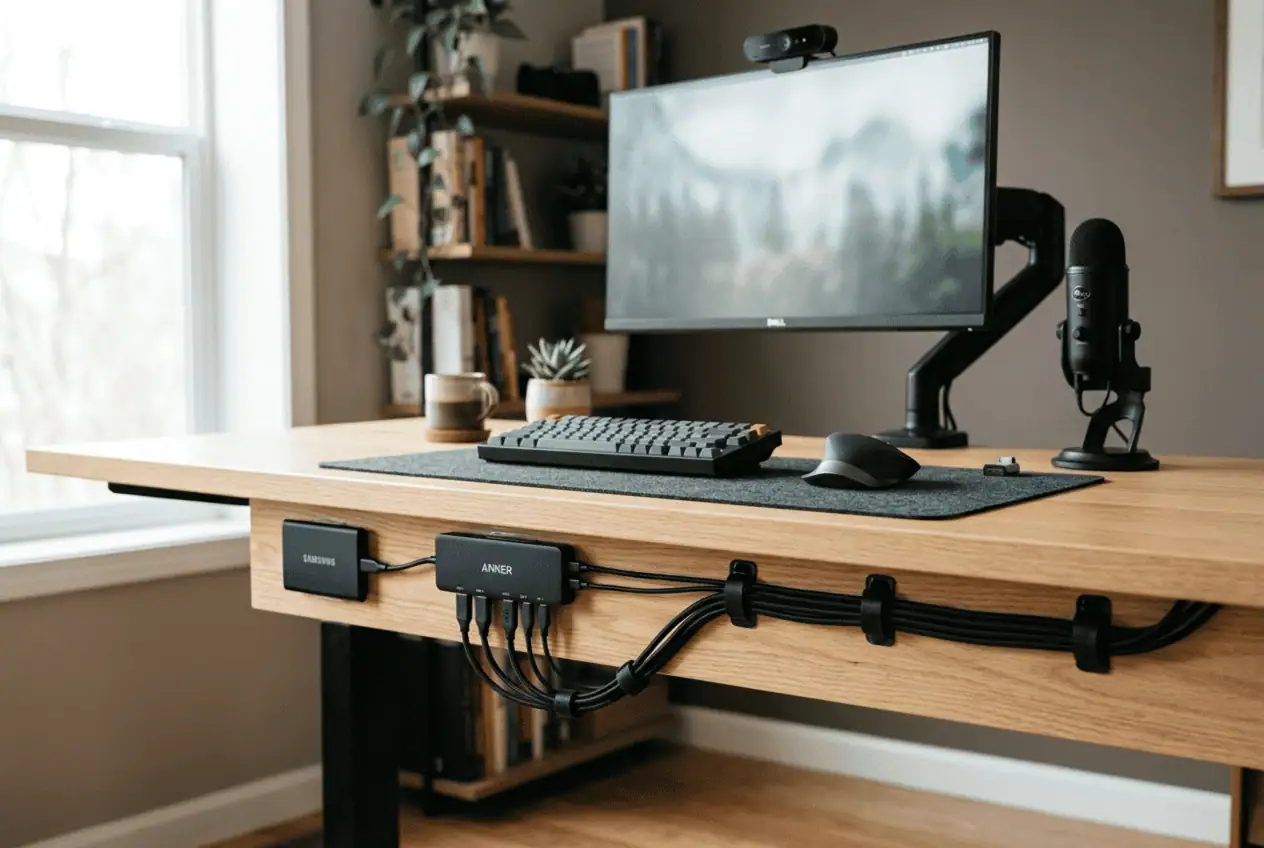
If you rarely connect new devices, you can also mount the hub under your desk to create a cleaner appearance while keeping permanent cables hidden.
Consider Your Desk Setup
The best location for a USB hub depends on how your workspace is arranged. Here are a few recommendations for different desk setups.
Laptop Workstation
Place the USB hub beside your laptop stand or docking station. This keeps the main connection cable short and allows you to connect or disconnect your laptop with a single cable.
Good docking station cable organization also helps keep charging, display, and USB connections grouped together while reducing desktop clutter.
Desktop PC Setup
If your computer sits under the desk or beside it, keep the USB hub on the desktop near your keyboard and mouse. This reduces long cable runs while making the ports easier to access.
Standing Desk
Mount the USB hub to the moving part of the desk rather than the wall or floor. This prevents cables from stretching every time you raise or lower the desk.
Following good standing desk cable management practices helps keep USB and power cables moving safely with the desk while reducing strain on connectors.
Gaming Setup
Place the hub where controllers, charging cables, and gaming accessories are easy to reach. This keeps frequently used devices organized without adding unnecessary clutter to your desk.
Avoid High-Clutter Areas
Avoid placing your USB hub behind your computer, next to a crowded power strip, or inside an overfilled cable box. These locations make it harder to connect devices, troubleshoot problems, and keep cables organized.
Instead, choose a location with enough space to plug in new devices, remove USB drives safely, and keep cables following a clean, consistent path.
Route USB Hub Cables Efficiently

Once your USB hub is in the right location, the next step is routing the cables. A well-planned cable route keeps your workspace organized, simplifies troubleshooting, and makes future upgrades much easier.
The goal isn’t to make every cable invisible. Instead, organize each cable so your workspace stays clean, accessible, and easy to maintain.
Follow One Main Cable Path
Instead of allowing every cable to travel in a different direction, create one main route that all cables follow before branching off to individual devices.
Whenever possible, route cables:
- Along the back edge of your desk
- Behind the monitor stand
- Under the desktop
- Through a cable raceway or cable tray
Keeping cables together creates a cleaner appearance while making it easier to identify and replace a cable when needed.
Keep Similar Cables Together
Grouping cables by their purpose makes your setup easier to understand and maintain.
Permanent devices
These devices usually stay connected all the time and can remain hidden behind your desk or inside a cable tray.
Examples include:
- Keyboard
- Mouse
- Webcam
- Printer
- Speakers
Planning your keyboard and mouse cable routing separately can keep your most frequently used cables tidy while making future changes easier.
Frequently connected devices
These devices are plugged in only when needed, so they should remain easy to access.
Examples include:
- USB flash drive
- External SSD
- Camera cable
- Phone charging cable
Separating these groups keeps your desk organized without making everyday tasks less convenient.
Leave Slack Where Equipment Moves
Not every cable should be pulled tight. Equipment that moves regularly needs a little extra cable length to prevent unnecessary strain.
Leave a small service loop for:
- Standing desks
- Monitor arms
- Adjustable monitor stands
- Laptop stands
This helps protect both the cable and the USB connector while reducing the risk of accidental disconnections.
Separate USB and Power Cables
USB data cables and power cords often end up bundled together, making maintenance more difficult.
For a cleaner setup:
- Route USB cables together.
- Keep monitor power cables and laptop chargers in a separate bundle.
- Position power adapters close to your surge protector or power strip.
This simple habit makes it much easier to identify cables whenever you upgrade or replace equipment.
Cable Management Accessories Worth Using

You don’t need dozens of cable management products to organize your USB hub. In many cases, moving the hub to a better location and shortening cable runs will make the biggest difference.
Once your cable layout is planned, a few simple accessories can help keep everything organized.
Cable Clips
Cable clips keep individual cables routed along the edge or underside of your desk. They’re ideal for keyboard, mouse, webcam, and charging cables, especially where cables change direction.
Hook-and-Loop Cable Straps
Reusable hook-and-loop straps bundle cables together while making it easy to add, remove, or rearrange devices. They’re a more flexible and reusable option than disposable zip ties.
Cable Sleeves
Cable sleeves combine several cables into one tidy bundle, making them ideal when multiple cables travel to the same location. While they improve appearance, removing individual cables later takes a little more effort.
Under-Desk Cable Trays
Under-desk cable trays hide cable bundles, power adapters, and excess cable length while keeping them off the floor. They also make cleaning around your workspace much easier.
Cable Raceways
Cable raceways guide cables along the back or underside of your desk, protecting them from accidental pulls while reducing visible clutter. They’re best suited for cable runs that rarely change.
A J channel cable raceway is especially useful when you want to hide cables while still being able to access or rearrange them later.
Powered vs. Bus-Powered USB Hubs
The type of USB hub you choose also affects your cable management. Both options expand the number of USB ports available, but they differ in how they’re powered and the types of devices they can support.
Bus-Powered USB Hubs
A bus-powered USB hub receives power directly from your computer, so it doesn’t require a separate power adapter. With one less cable to manage, it’s a good choice for compact desks, travel setups, and basic home offices.
Bus-powered hubs are best suited for low-power devices such as:
- Keyboard
- Mouse
- USB flash drive
- Card reader
- Webcam
Powered USB Hubs
A powered USB hub includes its own power adapter, allowing it to deliver more power to connected devices. Although this adds another cable to your setup, it’s the better choice if you regularly use several high-power peripherals.
Common examples include:
- External hard drives
- High-speed SSDs
- USB microphones
- Audio interfaces
- Capture cards
- Multiple charging devices
If your workspace includes several demanding USB devices, a powered hub provides a more stable and reliable connection.
Managing the Power Adapter
If you’re using a powered USB hub, don’t forget to organize the power adapter as well.
For the cleanest setup:
- Position the adapter near your surge protector or power strip.
- Store excess cable inside an under-desk cable tray if possible.
- Leave enough space around the adapter for airflow.
- Avoid stacking several large power adapters together.
Managing the power cable properly helps keep the area around your USB hub clean, organized, and easier to maintain.
Common USB Hub Cable Management Mistakes
Even with a good plan, a few simple mistakes can make your workspace look cluttered again. Avoiding these common problems will help keep your cable management system organized for the long term.
Choosing the Wrong Location
Your USB hub is the center of your cable layout. If it’s placed too far from your devices, you’ll end up with longer cable runs, unnecessary clutter, and ports that are harder to reach.
Before securing the hub in place, make sure it’s close to the devices you use most while still allowing easy access to frequently used USB ports.
Using Cables That Are Too Long
Long cables often create loops behind the monitor, collect dust, and become tangled with other wires.
Whenever possible, use cables that match the distance they need to cover. If replacing them isn’t practical, bundle the extra length neatly with reusable hook-and-loop straps.
Trying to Hide Every Cable
A completely cable-free desk may look impressive, but it isn’t always the most practical solution.
Devices you use regularly, such as phone chargers, USB flash drives, and external SSDs, should remain easy to access. Focus on hiding permanent cables while keeping frequently used connections within reach.
Using wireless peripherals where practical can also reduce the number of USB cables running across your desk without changing how you work.
Ignoring Future Upgrades
Many desks are organized around today’s devices without leaving room for tomorrow’s additions.
If you plan to add another monitor, webcam, docking station, or external drive, leave a little space for future expansion by:
- Keeping one or two USB ports available.
- Using reusable cable straps instead of permanent zip ties.
- Leaving extra room inside cable trays or raceways.
A flexible cable management system is much easier to maintain as your workspace grows.
Pulling Cables Too Tight
Cables should never remain under constant tension.
If you use a standing desk, monitor arm, or adjustable laptop stand, leave a small amount of slack where movement occurs. This protects both the cable and the USB connector while helping prevent accidental disconnections.
Keep Your Setup Organized Over Time
Good cable management isn’t something you do once and forget. As your workspace changes, your cable layout should change with it.
Spending a few minutes on occasional maintenance helps keep your desk organized without needing to start from scratch.
Review Your Cable Layout Regularly
Every few months, take a quick look at your setup and check for small issues before they become bigger problems.
During your review:
- Remove cables you no longer use.
- Check that cable clips and straps are still secure.
- Make sure frequently used USB ports remain easy to access.
- Adjust cable slack around monitor arms or standing desks if needed.
Regular maintenance takes only a few minutes but helps prevent clutter from building up again.
Remove Unused Devices
Remove charging cables, unused USB hubs, and accessories you no longer use. Clearing out unnecessary devices reduces cable clutter and frees up valuable USB ports for future upgrades.
Clean Around Your Cable Setup
Dust collects quickly around cable bundles and underneath desks.
When cleaning your workspace:
- Wipe cables with a soft microfiber cloth.
- Remove dust from cable trays and raceways.
- Check that cables still follow your planned route.
- Replace any cable clips that have come loose.
Keeping your cable management system clean also makes it easier to spot worn or damaged cables before they become a problem.
Update Your Setup as It Grows
Every new device can either fit neatly into your existing cable layout or create unnecessary clutter if connected without a plan.
Before adding a new accessory, ask yourself:
- Does this cable follow my existing cable route?
- Can I use a shorter cable?
- Should this device stay permanently connected?
- Will I still have easy access to the USB ports I use most?
Making these small adjustments as your setup evolves is much easier than reorganizing every cable later.
Conclusion
USB hub cable management doesn’t have to be complicated. By placing your hub in the right location, routing cables carefully, and using a few simple cable management accessories, you can create a cleaner and more organized workspace. As your setup changes, small adjustments and regular maintenance will help keep cable clutter under control, making it easier to add new devices while keeping your desk functional and easy to use.
FAQs
Can I leave my USB hub plugged in all the time?
Yes. Most quality USB hubs are designed to stay connected continuously. Just make sure the hub has proper ventilation and isn’t overloaded with more devices than it can support.
Should I mount my USB hub under my desk?
If you rarely unplug devices, mounting the hub under your desk is a great way to reduce visible cable clutter. However, if you frequently use USB flash drives or external SSDs, keeping it on top of the desk is usually more convenient.
Can cable management improve USB device reliability?
Cable management won’t increase USB speed, but it can reduce accidental disconnections, prevent unnecessary strain on connectors, and make it easier to identify and replace faulty cables.
How many devices can I safely connect to a USB hub?
That depends on the hub’s specifications and whether it’s bus-powered or externally powered. For several high-power devices, a powered USB hub is generally the better choice.
How often should I reorganize my USB hub cables?
There’s no fixed schedule, but it’s a good idea to review your cable setup whenever you add or remove devices. A quick check every few months also helps keep your workspace neat.