


A power strip on the floor can make even a tidy desk look messy. It collects dust, takes up legroom, and leaves cables spread everywhere. Hiding it under your desk is a simple way to create a cleaner and more organized workspace.
In this guide, you’ll learn how to hide a power strip under desk safely, choose the best mounting method, and organize your cables so your setup stays neat and easy to maintain.
Why Hide a Power Strip Under Your Desk?
Most desks have more devices than people realize.
You may have:
- Monitor
- Laptop or desktop PC
- Desk lamp
- Speakers
- Phone charger
- USB hub
- Printer
- Docking station
When every cable runs to a power strip on the floor, your workspace quickly becomes cluttered.
Mounting the power strip underneath the desk helps:
- Keep cables out of sight
- Free up floor space
- Reduce trip hazards
- Make vacuuming easier
- Create a cleaner-looking workspace
A tidy desk is also easier to maintain. When everything has a place, adding a new device later becomes much simpler.
Keeping cables off the floor also makes PC cable cleaning easier by reducing dust buildup around tangled cords.
Is It Safe to Hide a Power Strip Under a Desk?
Yes, it is generally safe if you install it correctly.
Choose a quality surge protector or mountable power strip that is in good condition. Replace it if the housing is cracked, the cord is damaged, or the outlets feel loose.
For a safe installation:
- Do not overload the power strip.
- Do not plug one power strip into another.
- Keep the power switch easy to reach.
- Leave enough space around large power adapters for airflow.
- Inspect cables regularly for damage.
Avoid running power cords under rugs. Pressure and friction can damage the cable over time. If a cable must cross the floor, use a floor cable cover or cable raceway instead.
Following these simple steps will help keep your workspace both clean and safe.
Should You Choose a Surge Protector or a Basic Power Strip?
A basic power strip only adds more outlets.
A surge protector also helps protect your electronics from unexpected power spikes.
If your desk powers expensive devices such as:
- Desktop PC
- Gaming PC
- Laptop
- Monitor
- Docking station
a surge protector is usually the better choice.
When shopping, look for a UL Listed model with:
- Enough outlets for your devices
- One or two spare outlets for future upgrades
- Built-in mounting slots or brackets
- Wide outlet spacing for large power adapters
Choosing the right model now makes installation much easier later.
Plan Before You Start
A few minutes of planning can save a lot of time.
Before mounting the power strip, answer these questions:
- How many devices need power?
- Will you add more devices later?
- Which wall outlet is closest?
- Can every cable reach comfortably?
- Will you be able to reach the power switch?
Think about future upgrades as well. You may later add a second monitor, webcam, charging station, microphone, or another USB hub. Leaving one or two outlets free now prevents having to reorganize everything later.
Next, check the underside of your desk.
Solid wood desks usually support screw mounting, while glass desks and many rental setups work better with adhesive mounts or clamp-on accessories.
Finally, plan the cable route before installing anything. The shortest path from the power strip to the wall outlet usually creates the cleanest setup.
Good planning takes only a few minutes, but it helps you avoid extra holes, stretched cables, and unnecessary clutter later.
How to Choose the Right Power Strip for Under-Desk Mounting
Not every power strip is made for under-desk installation. Choosing the right one before you start will make the job easier and keep your setup safer.
Look for these features:
- Enough outlets for your current devices
- One or two spare outlets for future upgrades
- A power cord that easily reaches the wall outlet
- Wide outlet spacing for large power adapters
- Built-in USB ports if you charge phones or tablets
- Mounting slots or brackets for secure installation
If you have a simple laptop setup, a smaller power strip may be enough. For a gaming setup or dual-monitor workstation, choose a model with more outlets so every device has enough space.
Choose the Best Place to Mount a Power Strip Under Your Desk

The mounting location affects how clean your setup looks and how easy it is to use.
For most desks, the rear center is the best position. It keeps cables hidden and allows devices on both sides of the desk to reach the power strip.
If your wall outlet is on one side, mounting the power strip in the rear left or rear right corner can shorten the main power cable.
Keep the power strip close enough to the back edge that you can still reach the power switch.
Avoid mounting it:
- Near your knees
- Behind desk drawers
- Close to heating vents
- Where cables can be pinched
A few minutes spent choosing the right location will make cable management much easier.
Best Ways to Hide a Power Strip Under a Desk

There are several ways to mount a power strip. The best option depends on your desk and whether you want a permanent or removable installation.
Screw Mounting
This is the strongest and most secure method.
It works best for:
- Solid wood desks
- MDF desks
- Permanent setups
Many mountable surge protectors include keyhole slots that fit over two screws installed underneath the desk.
Adhesive Mounting
If you do not want to drill holes, heavy-duty adhesive strips or mounting brackets are a good alternative.
This method is best for:
- Renters
- Lightweight power strips
- Smooth desk surfaces
Always follow the manufacturer’s weight limit.
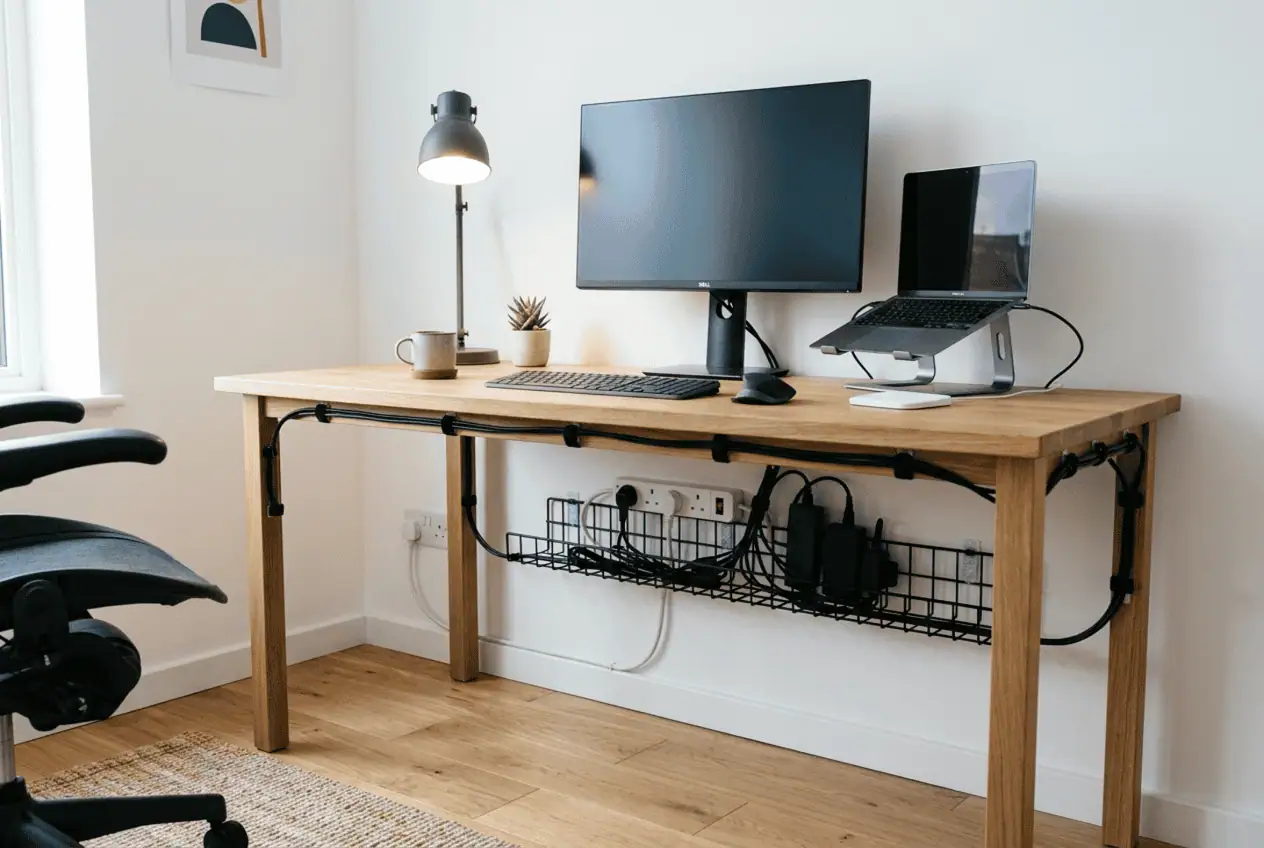
Under-Desk Cable Tray
A cable tray does more than hide the power strip.
It can also hold:
- Laptop chargers
- Monitor power supplies
- AC adapters
- Extra cable length
This keeps everything together and makes future upgrades easier.
Clamp-On Mounts
Clamp-on accessories attach to the desk without screws or adhesive.
They are ideal if you:
- Have a standing desk
- Move your desk often
- Want a removable setup
Best Options for Renters
If you rent your home or office, you may not want to drill into your desk.
Good renter-friendly options include:
- Heavy-duty adhesive mounting strips
- Clamp-on cable trays
- Removable cable clips
- Reusable Velcro cable ties
These accessories help create a clean setup while avoiding permanent damage.
How to Install a Power Strip Under Your Desk
Installing a power strip is a simple project when you follow the steps in order.
Step 1: Gather Your Tools
Depending on your mounting method, you may need:
- Screwdriver
- Screws
- Mounting tape
- Measuring tape
- Pencil
- Velcro cable ties
Step 2: Clean the Mounting Surface
Wipe the underside of the desk before mounting anything.
A clean surface helps adhesive stick better and makes it easier to mark the correct position.
Step 3: Test the Position
Hold the power strip in place before attaching it.
Make sure:
- Every cable reaches comfortably.
- The main power cord reaches the wall outlet.
- The power switch stays easy to access.
Adjust the position if needed.
Step 4: Mount the Power Strip
Secure the power strip using screws, adhesive mounts, or a cable tray.
Check that it feels stable before plugging in any devices.
Step 5: Connect Your Devices
Plug in each device one at a time.
If you use large laptop chargers or monitor power adapters, spread them across the outlets so they do not block each other.
Leave one or two outlets free if you expect to add more devices later.
Step 6: Organize the Cables
Bundle cables that travel in the same direction with reusable Velcro cable ties.
Keep cables close to the underside of the desk instead of letting them hang down.
Step 7: Test Everything
Turn on every connected device and make sure everything works properly.
Finally, check that:
- The power strip is secure.
- No cables are stretched.
- The power switch is easy to reach.
- Nothing hangs below the desk.
Once these checks are complete, your workspace is ready to use with a cleaner and more organized cable setup.
Organize Your Cables After Mounting the Power Strip

Mounting the power strip is only half the job. Organizing the cables is what makes your desk look clean and stay that way.
Bundle Similar Cables
Group cables that run in the same direction using reusable Velcro cable ties.
This keeps the cables neat and makes it easier to add or remove devices later.
Secure Hanging Cables
Use cable clips or adhesive cable holders to keep cables attached to the underside of the desk.
This prevents cables from hanging down where they can be kicked or pulled accidentally.
Support Large Power Adapters
Laptop chargers, monitor power supplies, and other AC adapters can be heavy.
Instead of letting them hang from the power strip, place them inside an under-desk cable tray or cable basket. This reduces strain on the outlets and keeps everything organized.
Label Important Cables
If several devices share the same power strip, label each cable.
Simple labels help you quickly identify your monitor, laptop charger, speakers, or USB hub without unplugging the wrong cable, especially if you label your PC cables consistently.
Keep the Main Power Cable Neat
Route the main power cable along one desk leg using cable clips or a cable sleeve.
If the cable must cross the floor, use a cable raceway or floor cable cover instead of placing it under a rug.
A planned cable route keeps your workspace cleaner and improves safety.
Special Tips for Standing Desks

Standing desks need a little extra planning because the desktop moves throughout the day.
Mount the Power Strip to the Desk
Always mount the power strip underneath the desktop instead of leaving it on the floor.
This allows the power strip to move with the desk, so only one cable runs to the wall outlet.
Leave Enough Cable Slack
Raise the desk to its highest position before securing the cables.
Every cable should have enough slack to move freely without pulling on the connector.
Keep Cables Together
Route cables down one desk leg using a cable sleeve, cable channel, or cable spine.
This keeps the cables protected while allowing smooth movement as the desk changes height.
Test Before Daily Use
Move the desk from its lowest to highest position a few times.
Check that:
- No cable becomes tight.
- No cable rubs against the frame.
- No cable hangs too low.
Make small adjustments before using the desk every day.
Common Mistakes to Avoid
Avoiding a few simple mistakes will help your setup stay clean and safe.
Mounting the Power Strip Too Far Forward
A power strip near the front edge is easier to see and may get in the way of your legs.
Mount it closer to the back of the desk whenever possible.
Blocking the Power Switch
Do not hide the power strip where you cannot reach the power switch or reset button.
You should always be able to access it quickly.
Overloading the Power Strip
Never plug in more devices than the power strip is designed to handle.
If you need additional outlets, replace it with a larger surge protector instead of connecting multiple power strips together.
Filling Every Outlet
Leave one or two outlets available for future devices.
This makes it easier to add a second monitor, charging station, or other accessories later.
Leaving Cables Loose
Even a well-mounted power strip can look messy if the cables hang below the desk.
Spend a few extra minutes securing every cable neatly. It will make your workspace easier to clean and more enjoyable to use.
Conclusion
Hiding a power strip under your desk is a simple way to reduce cable clutter and create a cleaner workspace. Choose the right mounting method, organize your cables carefully, and leave room for future devices. With a little planning, you can keep your desk safer, easier to clean, and more organized every day.
FAQs
Can I mount a power strip upside down?
Yes, if the manufacturer allows it and the power strip stays firmly attached. Make sure the outlets and power switch remain easy to access.
How high should I mount a power strip under a desk?
Mount it close to the back edge of the desk, high enough to keep it off the floor but low enough that you can still reach the power switch when needed.
Can I use a power strip with a glass desk?
Yes, but avoid drilling into the glass. Adhesive mounts or clamp-on cable trays are safer options for most glass desks.
How often should I check my under-desk cable setup?
Inspect your power strip and cables every few months as part of your regular PC wiring maintenance checklist.
Look for loose mounts, damaged cords, or cables that have become stretched after adding new devices.
Should the outlets face up or down?
Either direction can work, but many people prefer downward or sideways-facing outlets because they help reduce cable clutter and make the setup look cleaner.