


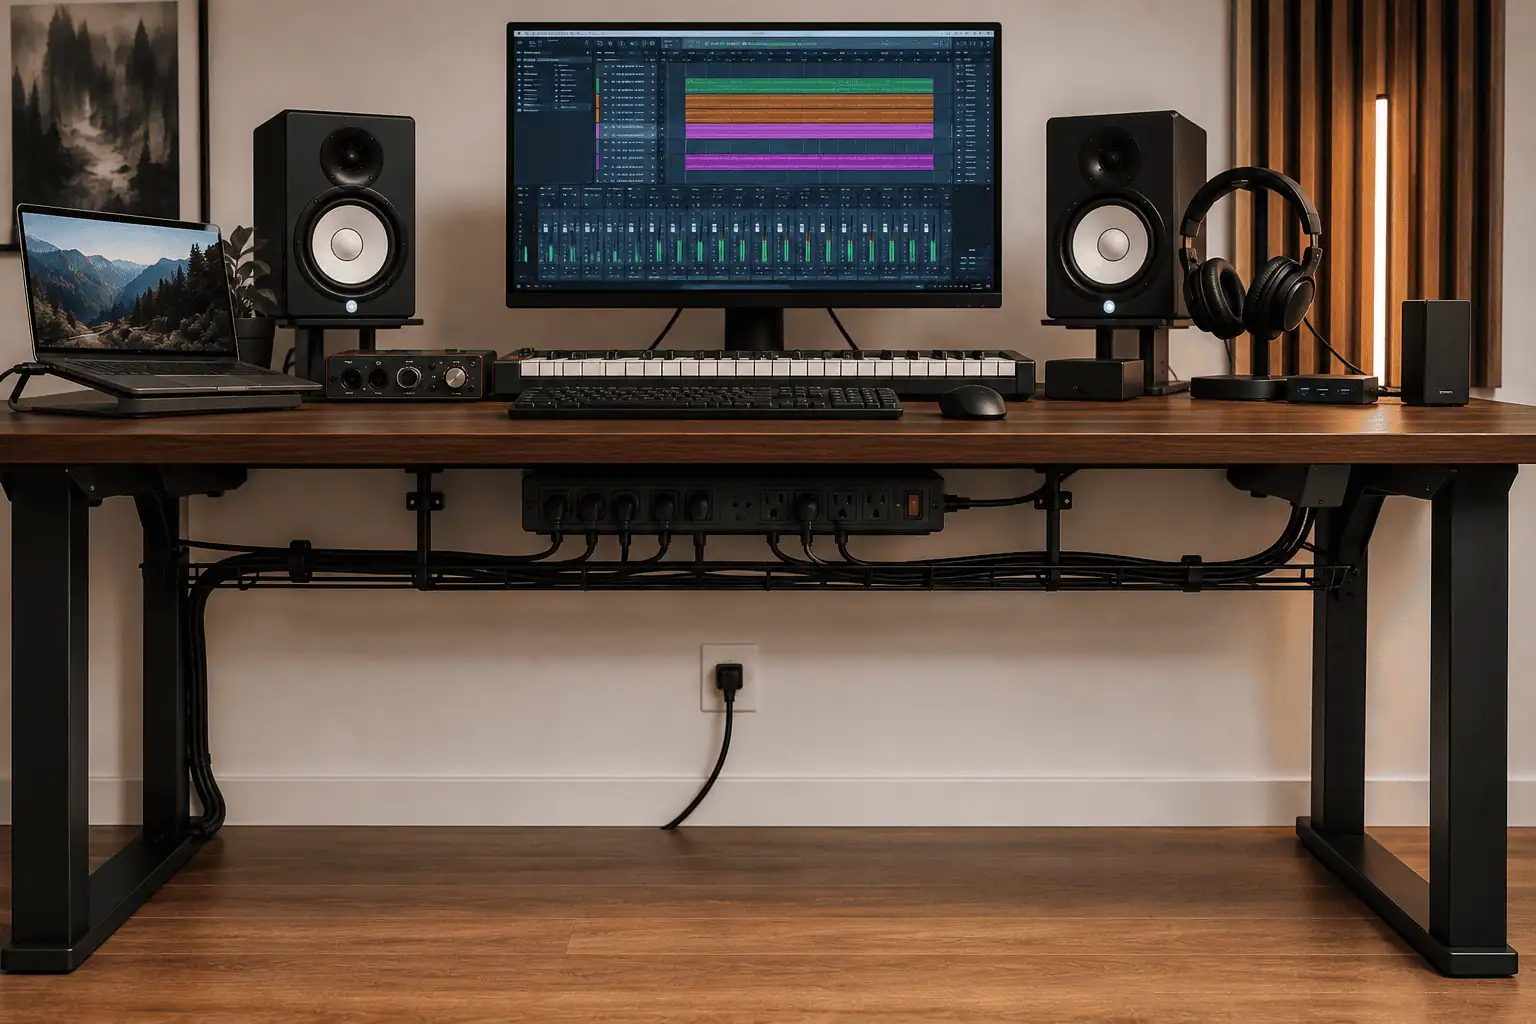
Every new piece of gear adds another cable. At first, it is easy to ignore. After a few upgrades, your home recording studio becomes harder to clean, harder to use, and harder to maintain. XLR cables, USB cables, power cords, and monitor cables slowly take over your recording desk.
Whether you have a small bedroom studio or a dedicated music production setup, you do not need expensive cable organizers or a bigger desk. These practical fixes solve the biggest cable problems and help you create a cleaner studio workspace, save time during recording sessions, and make future upgrades much easier.
Fix #1: Plan Your Cable Routes Before You Buy Organizers
Buying cable clips, cable sleeves, or Velcro straps before planning your setup often creates more work than results.
A clean home recording studio starts with a clear cable route, not with more accessories.
The Problem
Most home studios grow one piece of equipment at a time.
You buy an audio interface.
Then studio monitors.
Next comes a MIDI keyboard.
A few months later, you add another microphone, a monitor arm, an external SSD, or a USB hub.
Each new device gets connected wherever there is space.
Eventually, every cable follows a different path.
That is why your recording desk still feels crowded, even if you already use cable ties.
If Your Setup Is Already a Mess
Do not waste time fixing one cable at a time.
Disconnect the equipment you can safely remove.
Clean the area first.
Then reconnect one device at a time.
Most people find this much faster than trying to untangle years of cable clutter.
Common Mistake: Many people buy more cable organizers before fixing their cable layout. More accessories cannot solve a poor cable route.
The Solution
Before reconnecting anything, decide where every device should stay.
Start with equipment that rarely moves.
Permanent Equipment
- Audio interface
- Studio monitors
- Desktop computer
- Monitor controller
- Power strip
- External SSD
Now identify equipment you use regularly.
Temporary Equipment
- Microphone
- Headphones
- Guitar
- Camera
- Portable recorder
- MIDI controller
Next, create one main cable route behind your studio desk.
Instead of letting every cable travel in a different direction, guide them along the same path whenever possible.
Keep power cables, audio cables, and data cables on their own routes from the beginning.
Why This Works
Every cable should have a planned destination before it is plugged in.
That is one reason professional recording studios often look cleaner than home studios. They do not have fewer cables. They simply have a plan for every cable.
Planning your layout first also saves time later because adding new equipment becomes much simpler.
Fix #2: Move the Cable Mess Off the Floor
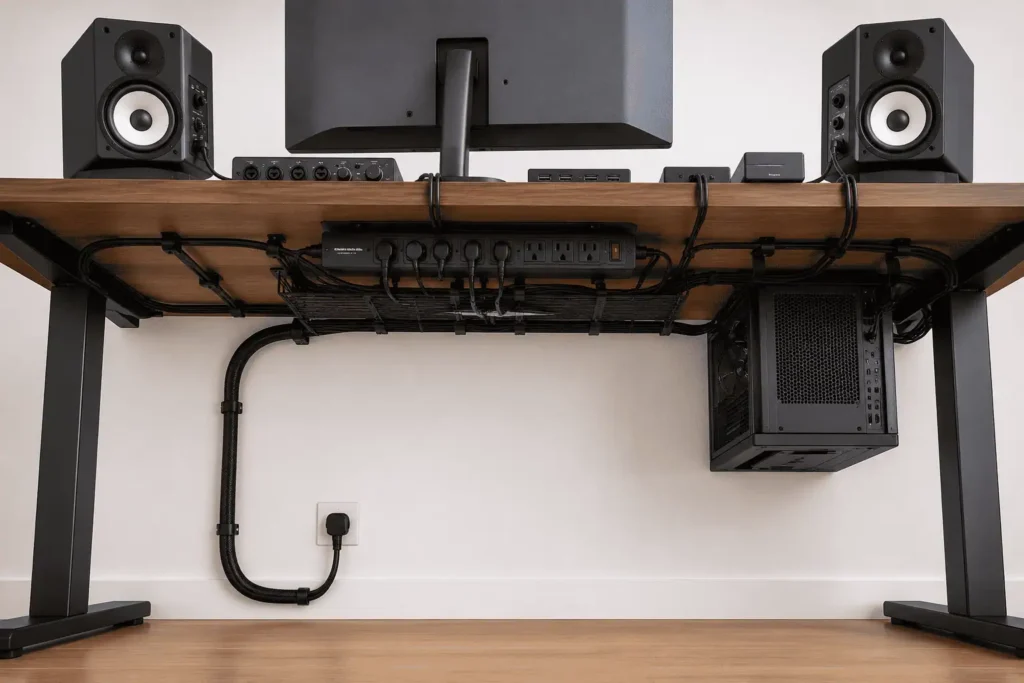
Once your cable routes are planned, the next step is to deal with the area that usually creates the biggest mess.
For most home studios, that place is underneath the desk.
The Problem
Look below your recording desk.
You will probably find:
- Power strip
- Power adapters
- USB hub
- Extension cord
- Loose power cables
- Extra cable loops
Everything ends up in one pile.
Dust builds up faster.
Vacuuming around your desk becomes frustrating.
Even replacing one cable can disturb several others.
The Solution
The easiest improvement is to move everything off the floor.
Mount your power strip underneath the desk instead of leaving it beside your chair.
Now every power cable has one destination instead of several.
Next, hide cable bundles instead of letting them hang freely.
Good options include:
- Under-desk cable tray
- Cable raceway
- Adhesive cable clips
- Cable sleeve
If several cables travel to the same device, place them inside one cable sleeve.
For example:
- Studio monitor cables
- USB cables
- Display cables
This creates one neat cable bundle instead of several loose wires.
Hide Power Bricks Too
Large power adapters often create more visual clutter than the cables themselves.
Instead of leaving them on the floor, place them inside your under-desk cable tray or a cable management box.
This also makes it much easier to dust and clean underneath your desk.
Quick Tip: Try to leave only one power cable running from your desk to the wall outlet. Mounting the power strip underneath the desk makes this much easier.
If You Use a Standing Desk
A standing desk needs extra cable slack.
Raise the desk to its highest position before securing any cables.
Then guide the main cable bundle down one desk leg using cable clips or a cable raceway.
This prevents cables from pulling tight every time you change the desk height.
Why This Works
Most visible cable clutter comes from underneath the desk.
Cleaning up this single area often changes the entire look of your studio.
It also makes everyday tasks like vacuuming, dusting, and replacing equipment much easier.
Fix #3: Stop Using Cables That Are Too Long
Now that your cable routes are cleaner, look at the cables themselves.
Many home studio owners discover that the biggest source of clutter is simply using cables that are much longer than necessary.
The Problem
Long cables leave large loops behind your recording desk.
Those loops:
- Collect dust
- Tangle with nearby cables
- Reduce free space
- Block airflow
- Make upgrades more difficult
For example, using a 20-foot XLR cable for a microphone that sits only three feet from your audio interface creates unnecessary clutter before you even start recording.
The same problem happens with:
- USB cables
- USB-C cables
- HDMI cables
- TRS cables
- Power cords
- Ethernet cables
The Solution
Measure the distance between your equipment before buying replacement cables.
Whenever possible, choose cables that closely match the required length.
This often improves your desk cable management more than buying another accessory.
Do Not Remove Every Bit of Slack
Leave a small service loop behind equipment that may need to move.
For example:
- Audio interface
- Studio monitors
- Desktop computer
- Monitor arm
A service loop is a small amount of extra cable that lets you move equipment for cleaning or upgrades without unplugging everything.
If replacing long cables is not possible yet, coil the unused section neatly and secure it with a reusable Velcro strap.
Avoid leaving loose cable loops hanging behind your desk.
Expert Insight: The cleanest studios are rarely the ones with the most cable organizers. They are usually the ones using cables that are the correct length from the start.
Why This Works
The best cable clutter is the cable that is not there.
Using the correct cable length removes unnecessary loops before you install cable trays, cable sleeves, or cable clips.
That gives you a cleaner workspace, better airflow, and more room for future equipment.
Fix #4: Separate Power, Audio, and Data Cables
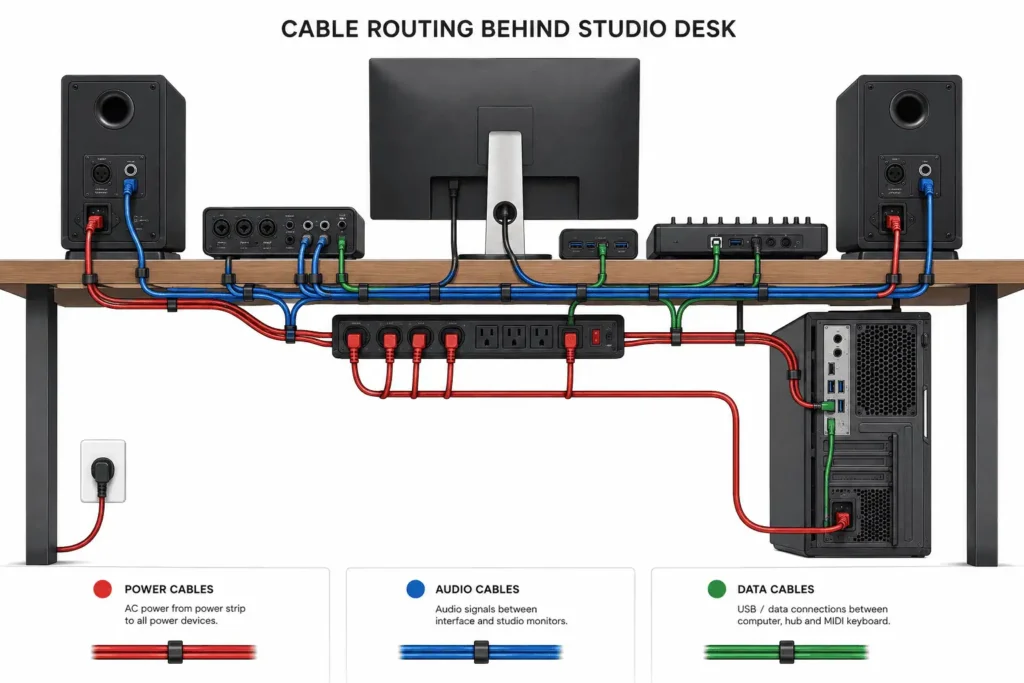
Your cable layout is starting to come together.
Now it is time to organize cables by what they do, not just where they go.
This simple change makes your setup easier to maintain and can even help reduce unwanted audio noise.
The Problem
Many home recording studios place every cable inside one large bundle.
That bundle often includes:
- Power cables
- XLR cables
- TRS cables
- USB cables
- MIDI cables
- Ethernet cables
At first, everything looks tidy.
Later, finding one cable becomes frustrating.
Even worse, running power cables beside audio cables for long distances may introduce unwanted hum into your recording setup.
The Solution
Instead of one large cable bundle, create separate paths for different cable types.
Power Cables
Keep these together.
- Computer power cable
- Studio monitor power cables
- Audio interface power adapter
- Power strip cables
Audio Cables
Route these on their own path.
- XLR microphone cables
- TRS cables
- Speaker cables
Data Cables
Bundle these separately whenever possible.
- USB cables
- USB-C cables
- MIDI cables
- Ethernet cable
If power and audio cables must cross, let them cross quickly instead of running side by side.
This simple habit keeps your cable layout much cleaner.
Why It Matters: Separate cable groups are much easier to trace when something stops working. Instead of searching through one large bundle, you know exactly where to look.
Why This Works
Good cable management is not only about appearance.
It is also about making your recording setup easier to troubleshoot, easier to upgrade, and easier to maintain over time.
Fix #5: Replace Zip Ties with Velcro Straps
Many people use zip ties because they make cables look neat.
The problem starts when your studio grows.
The Problem
Home recording studios rarely stay the same.
Sooner or later, you will add:
- Another monitor
- A new microphone
- A MIDI keyboard
- An external SSD
- A headphone amplifier
Every upgrade means cutting old zip ties before you can add one more cable.
That quickly turns a simple upgrade into another cable management project.
The Solution
Use reusable Velcro straps for cable bundles that may change in the future.
They are much easier to remove when you need to:
- Add another cable
- Replace damaged equipment
- Clean behind your desk
- Upgrade your setup
Keep several spare Velcro straps in your desk drawer.
They take up very little space and save a lot of time during future upgrades.
When Zip Ties Still Make Sense
Zip ties are still useful for cable runs that rarely change.
Examples include:
- Wall-mounted cables
- Permanent speaker cables
- Rack wiring
Everything else is usually easier to manage with reusable Velcro straps.
Common Mistake: Pulling zip ties too tightly can make cables difficult to remove later. Velcro keeps cables secure without making future changes harder.
Why This Works
Your cable management system should grow with your studio.
Velcro gives you that flexibility without forcing you to rebuild everything every time you buy new gear.
Fix #6: Route Every Cable Through One Main Path
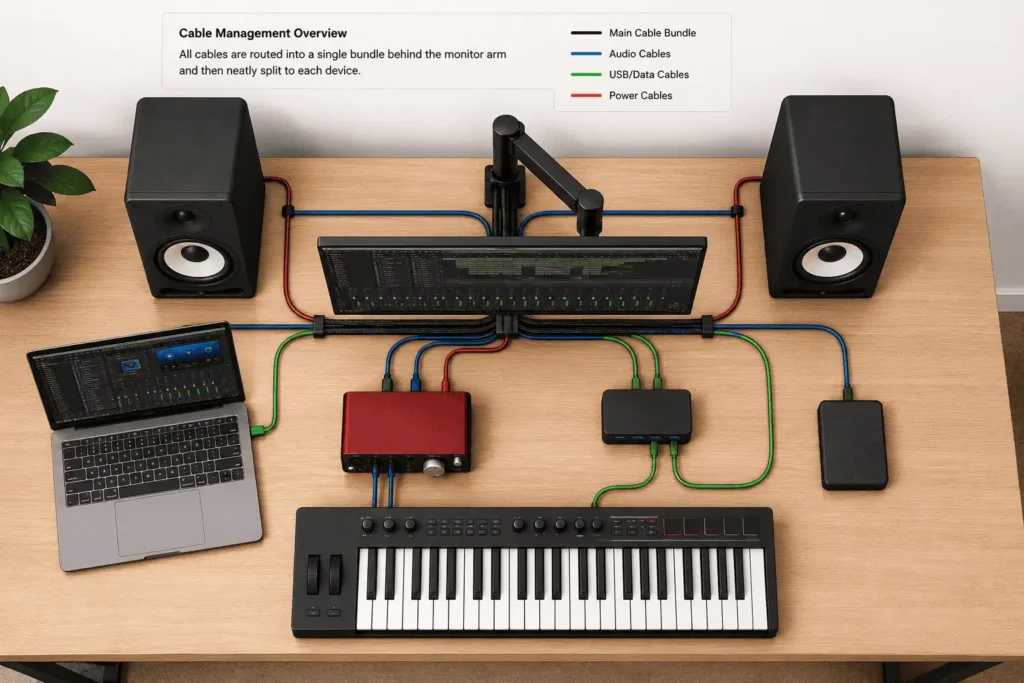
By now, your cables are grouped by type.
The final step is to make them travel together.
This is one of the easiest ways to make any recording desk look more organized.
The Problem
Many home studios have cables leaving the desk from every direction.
Some hang behind the monitor.
Others run down the side.
Several disappear behind speakers or furniture.
Even when those cables are tied neatly, the setup still looks untidy because there is no clear route.
The Solution
Choose one main cable path behind your recording desk.
Let most cables travel together before they split toward individual devices.
This works especially well for:
- Audio interface
- Studio monitors
- Desktop computer
- External SSD
- USB hub
Secure the bundle using cable clips or a cable sleeve.
Whenever possible, guide the bundle along the back edge of the desk instead of letting cables hang freely.
If you mounted your power strip underneath the desk earlier, try to leave only one power cable running from your desk to the wall outlet.
This simple change creates a much cleaner appearance.
A Simple Example
Imagine a bedroom studio with a laptop, two studio monitors, an audio interface, and a MIDI keyboard.
Instead of seeing six or seven cables running in different directions, they all travel through one main path before reaching each device.
The desk immediately looks cleaner without buying more accessories.
Expert Insight: Professional studios do not look organized because they have fewer cables. They look organized because every cable follows a planned route.
Why This Works
One main cable path makes your studio easier to understand at a glance.
It also saves time when cleaning, replacing equipment, or adding new gear because every cable follows the same organized system.
Fix #7: Label Your Cables Before You Forget
Your cables are now routed properly.
The next step is making sure you never have to guess where one belongs.
Many home studio owners skip this step. They only realize its value after moving their desk or upgrading their setup.
The Problem
Everything works perfectly until one cable gets unplugged.
A few days later, you cannot remember where it came from.
This happens most often with:
- XLR cables
- USB cables
- TRS cables
- Display cables
- Power adapters
Many of these cables look almost identical.
Without labels, a simple desk upgrade can quickly turn into a frustrating guessing game.
The Solution
Label both ends of every important cable.
Keep the labels short and easy to read.
Examples include:
- Left Monitor
- Right Monitor
- Audio Interface
- MIDI Keyboard
- USB Hub
- Main Display
You can also use colored labels or colored Velcro straps to separate cable groups.
The important thing is to use the same system throughout your studio.
Quick Tip: Label new cables as soon as you install them. Waiting until later usually means you will forget where they go.
Why This Works
Labels save time every time you clean your desk, replace equipment, or move your setup.
Instead of tracing cables one by one, you know exactly where every connection belongs.
Fix #8: Store Spare Cables the Right Way
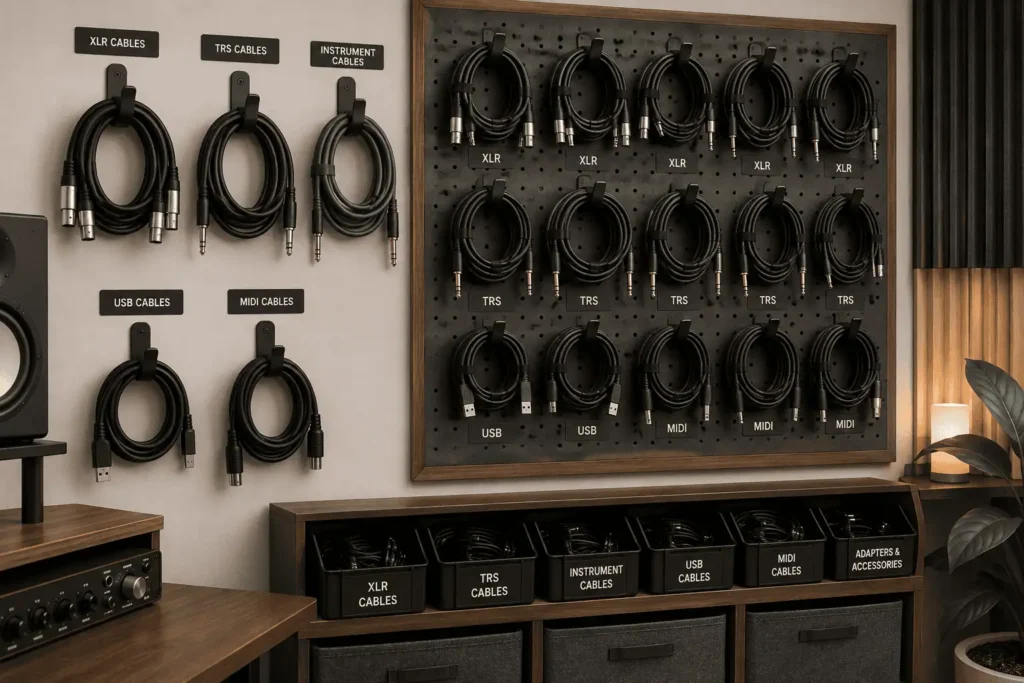
Your recording desk may look organized, but spare cables can still create unnecessary clutter.
This is one area many home studio owners forget until they need an extra cable.
The Problem
Unused cables often end up in one drawer or storage box.
After a few months, everything becomes tangled together.
Finding one cable means pulling out several others.
This usually happens with:
- XLR cables
- Instrument cables
- TRS cables
- USB cables
- MIDI cables
Besides wasting time, poor storage can also shorten the life of your cables.
The Solution
Store spare cables by both type and length.
Instead of mixing everything together, create separate storage for each group.
Good storage options include:
- Wall hooks
- Pegboards
- Cable hangers
- Storage bins with labels
Keeping similar cables together makes them much easier to find.
Wrap Cables the Right Way
Avoid wrapping cables into tight circles or tying knots.
Instead, use the over-under wrapping method.
This prevents cables from twisting, helps them lie flat when you unroll them, and reduces unnecessary stress on the cable.
That is why it is the preferred method in many recording studios and live sound setups.
Common Mistake: Throwing cables into a drawer without wrapping them first usually creates more work the next time you need one.
Why This Works
Proper storage protects your cables and keeps them ready to use.
Instead of spending time untangling spare cables, you can grab the right one and start recording.
Fix #9: Leave Space for Future Gear
By now, your setup probably looks much cleaner.
The last thing you want is to undo all that work when you buy another piece of equipment.
The Problem
Many people organize cables only for the gear they own today.
A few months later they add:
- A second monitor
- Another microphone
- A MIDI controller
- A headphone amplifier
- An external SSD
Suddenly there is no room left inside the cable tray or cable sleeve.
New cables start taking shortcuts, and the clutter slowly returns.
The Solution
Think about your next upgrade before it happens.
Leave extra space wherever possible.
- Leave free space inside your cable tray.
- Do not fill cable sleeves completely.
- Leave room inside cable raceways.
- Keep one or two spare outlets on your mounted power strip.
A good rule is to leave about 20 to 30 percent of your cable tray or sleeve empty.
That extra space makes future upgrades much easier.
Consider a Patch Bay for Larger Setups
If your home recording studio includes several hardware devices, a patch bay is worth considering.
Instead of reaching behind your desk every time you change equipment, you can manage audio connections from the front of the patch bay.
Most beginner studios will not need one.
However, if your setup includes multiple preamps, compressors, or rack equipment, a patch bay can reduce cable clutter and simplify your workflow.
Expert Insight: The easiest studio to upgrade is the one that was planned for growth from the beginning. Leaving a little extra space today can save hours of reorganizing later.
Why This Works
A cable management system should grow with your studio.
Planning for future equipment means every new cable follows the same organized path instead of creating another mess.
Fix #10: Keep Permanent and Temporary Cables Separate
Your studio is almost organized.
Now make sure your everyday cables do not ruin all the work you have already done.
Many home studios become messy again because every cable is treated the same.
The Problem
Some cables stay connected for years.
Others are plugged in only when you record.
When they are bundled together, a simple task like connecting a guitar or moving a microphone means opening the entire cable bundle.
That quickly creates another mess.
The Solution
Separate your cables into two groups.
Permanent Cables
These rarely move.
- Audio interface
- Studio monitors
- Desktop computer
- Display monitor
- Ethernet cable
- USB hub
Bundle these neatly and leave them in place.
Temporary Cables
These are used regularly.
- Microphone cable
- Guitar cable
- Headphones
- Camera cable
- Portable recorder
Keep these easy to reach.
A cable hook, headphone stand, or small cable hanger beside your recording desk works well for cables you connect every session.
Quick Tip: Never hide cables you use every day inside permanent cable bundles. They should always be easy to grab and easy to put back.
Why This Works
Permanent cables stay organized.
Temporary cables stay accessible.
That means less time setting up before every recording session and less chance of creating new cable clutter.
Fix #11: Spend Five Minutes Each Month on Cable Maintenance
Even the best cable management system needs a little attention.
The good news is that keeping it organized takes far less time than rebuilding it.
The Problem
Many people only organize their cables when the setup becomes impossible to manage.
By then:
- Dust has built up.
- Loose cables are hanging again.
- Labels have fallen off.
- New equipment has created another mess.
What could have been a five-minute job turns into a weekend project.
The Solution
Spend five minutes each month checking your studio.
During that time:
- Remove cables you no longer use.
- Tighten loose Velcro straps.
- Put cables back into their clips.
- Check cable labels.
- Make sure no cables are dragging across the floor.
These small adjustments prevent bigger problems later.
When a Quick Tidy Is No Longer Enough
Sometimes the clutter grows beyond a quick fix.
If that happens, disconnect the equipment you can safely remove and rebuild your setup one device at a time.
Many experienced home studio owners recommend this approach because it is often faster than trying to untangle cables individually.
Expert Insight: Cable management is much like keeping your recording desk clean. Small maintenance sessions are easier than waiting until everything becomes overwhelming.
Why This Works
A few minutes each month keeps your cable management system working.
Instead of starting from scratch every year, you simply keep improving what you already have.
Fix #12: Build Good Habits That Keep Cable Clutter Away
You have organized your studio.
Now the goal is to keep it that way.
Good cable management is not a one-time project. It becomes part of how you set up every new piece of equipment.
The Problem
Many home studios look great right after they are organized.
Then another monitor arrives.
A new USB cable gets added.
Another microphone joins the setup.
Instead of following the existing cable route, the new cable takes the quickest path.
Slowly, the clutter comes back.
The Solution
Every time you add new equipment, follow the same routine.
- Route the cable through your main cable path.
- Bundle it with similar cables.
- Label it if needed.
- Secure it with Velcro.
- Store any unused cable length neatly.
Following the same routine every time keeps your studio organized without much effort.
One Final Thought: The goal is not to hide every cable. The goal is to make every cable easy to find, easy to maintain, and easy to upgrade.
Why This Works
Good habits stop cable clutter before it starts.
Once every new cable follows the same system, your recording setup stays organized even as your studio grows.
Conclusion
A clean home recording studio is not built in one afternoon. It improves one small change at a time. Start with the fix that solves your biggest problem today, then build on it as your setup grows. Better cable routes, the right cable lengths, reusable Velcro straps, and a simple maintenance routine will help you spend less time managing cables and more time creating music. A well-organized studio is not the one with the fewest cables. It is the one where every cable has a purpose, a place, and a clear path.
FAQs
What is the best way to hide cables in a home recording studio?
The easiest method is to mount a power strip under your desk, use an under-desk cable tray, and route cables through cable clips or sleeves. This keeps most wires out of sight while making them easy to access when needed.
Should I use cable sleeves or cable raceways in my studio?
Cable sleeves work best for bundling several cables that travel together, while cable raceways are better for guiding cables along the back of a desk or down a desk leg. Many home studios benefit from using both.
How often should I reorganize my studio cables?
A full reorganization is rarely necessary if you maintain your setup regularly. Spending a few minutes each month checking cable routes, labels, and Velcro straps helps prevent cable clutter from building up.
Can poor cable management affect audio quality?
Yes, in some cases. Running power cables alongside audio cables for long distances may introduce unwanted hum or interference. Keeping power and audio cables on separate paths can help reduce this risk.
What are the most useful cable management accessories for a home recording studio?
A few basic accessories usually make the biggest difference: reusable Velcro straps, cable clips, an under-desk cable tray, a cable sleeve, and a mounted power strip. You do not need expensive products to keep your studio organized.
Is it worth replacing old cables just for better cable management?
If your current cables are much longer than necessary or are damaged, replacing them with the correct length can reduce clutter and make your studio easier to maintain. If the cables are in good condition, you can often improve the setup by rerouting and bundling them instead.